Lock Holdout Movement
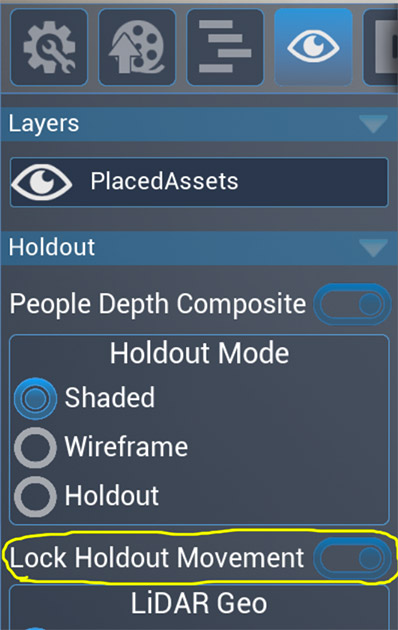
Quote from admin on 8 February 2024, 1:16 pmThe Lock Holdout Movement toggle is found in the Holdout panel in the Layers tab. This tool allows you to “lock” the Holdout objects so that they don’t move when using any of the Cyclops Camera Tools. This is very helpful in situations where you want to change how the CG environment aligns to the real world but have the Holdout objects stay in their correct location. A typical workflow would look like:
- Load up your scene that includes Holdout objects and models for your CG environment.
- Use the camera tools to align the scene with the real-world set. (You should save a Cloud Anchor when you are done to easily re-apply this alignment in the future.)
- After looking at Cyclops, the director wants the CG environment to be moved or rotated in relation to the set. However, if you use the Camera tool to re-align the CG environment then the holdout objects will no longer be aligned to their real-world set counterparts. You want to use the Camera tools but not affect the Holdout objects.
- To do this, go to the Holdout Panel and turn on Lock Holdout Movement.
- Now when you use the Camera tools to reposition the CG environment the Holdout objects will stay aligned to their real-world set counterparts.
- Resave your Cloud Anchor if you set one.
- Save a Collection to return to this alignment in the future. (You have affectively moved where the Holdout objects are located in the scene.)
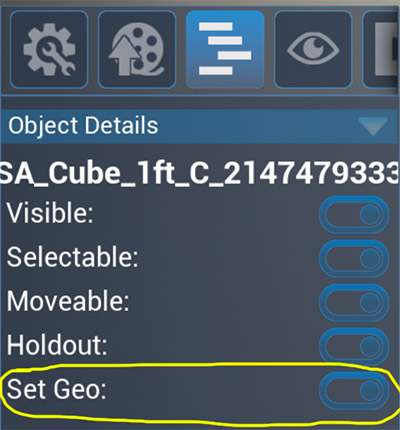
All Holdout objects should be affected by the Lock Holdout Movement tool. However, the Holdout objects need to have their Movement turned on. You may need to manually set this in the Object Details panel in the Outline Tab.
If you don’t want to use the Lock Holdout Movement tool to affect some of the Holdout objects you can toggle their Movement to off or toggle their Set Dec property to off.
The Lock Holdout Movement toggle is found in the Holdout panel in the Layers tab. This tool allows you to “lock” the Holdout objects so that they don’t move when using any of the Cyclops Camera Tools. This is very helpful in situations where you want to change how the CG environment aligns to the real world but have the Holdout objects stay in their correct location. A typical workflow would look like:
- Load up your scene that includes Holdout objects and models for your CG environment.
- Use the camera tools to align the scene with the real-world set. (You should save a Cloud Anchor when you are done to easily re-apply this alignment in the future.)
- After looking at Cyclops, the director wants the CG environment to be moved or rotated in relation to the set. However, if you use the Camera tool to re-align the CG environment then the holdout objects will no longer be aligned to their real-world set counterparts. You want to use the Camera tools but not affect the Holdout objects.
- To do this, go to the Holdout Panel and turn on Lock Holdout Movement.
- Now when you use the Camera tools to reposition the CG environment the Holdout objects will stay aligned to their real-world set counterparts.
- Resave your Cloud Anchor if you set one.
- Save a Collection to return to this alignment in the future. (You have affectively moved where the Holdout objects are located in the scene.)
All Holdout objects should be affected by the Lock Holdout Movement tool. However, the Holdout objects need to have their Movement turned on. You may need to manually set this in the Object Details panel in the Outline Tab.
If you don’t want to use the Lock Holdout Movement tool to affect some of the Holdout objects you can toggle their Movement to off or toggle their Set Dec property to off.
Uploaded files: